.webp)
I. What is a Lithium Polymer Drone Battery?
Lithium Polymer (LiPo) batteries are the most commonly used power source for modern drones. They adopt polymer electrolytes instead of traditional liquid electrolytes, boasting both high energy density and lightweight advantages. These batteries can provide drones with strong instantaneous discharge capacity to ensure rapid motor response, while their moldable design allows flexible adaptation to different drone models. The typical nominal voltage is 3.7V per cell (e.g., a 3S battery equals 11.1V), and the charging upper limit of 4.2V per cell must be strictly followed during actual use. It should be noted that LiPo batteries are extremely sensitive to overcharging, over-discharging, and physical impacts. Improper operation may cause swelling or even combustion. Therefore, they must be used with a balance charger and stored away from extreme environments.
II. How to Understand the Parameters of Lithium Polymer Drone Batteries?
Do you really need me to ramble on about battery working principles, cathode and anode materials, or ion movement if you’re just a novice drone pilot looking to buy a battery?
Absolutely not.
You just want a basic understanding to purchase the right battery for your drone and avoid being tricked by unscrupulous sellers!
But when shopping, sellers list a bunch of parameters that leave you confused. What do they all mean?
Let’s break down what capacity, voltage, cell count, discharge rate, internal resistance, and other key parameters represent:

(I) Capacity
The first thing to check when buying a drone battery is “capacity” — it directly determines how many minutes you can fly! Think of it like a phone battery: a 4000mAh phone battery lasts about 5 hours on a full charge, while a 2000mAh one might die in 2 hours. Drone batteries work the same way. The number marked with “mAh” (e.g., 1300mAh, 5000mAh) means the higher the number, the longer the theoretical flight time.
A quick note: 1000mAh equals 1Ah, which you can simply understand as “able to output 1 ampere of current for 1 hour total.” For example, a 1300mAh (1.3Ah) battery will last exactly 1 hour if discharged at 1.3A. If you fly aggressively and the current doubles to 2.6A, it will die in 30 minutes — similar to how your phone drains faster when playing games than when scrolling through WeChat.
Remember: Bigger isn’t always better. High-capacity batteries are heavier, and a drone carrying too much weight will struggle to fly or have shorter flight times — just like a person running with 5kg of luggage won’t be as fast as someone traveling light.
● Quick Tips:
● Check your drone’s manual for the recommended capacity first; don’t blindly chase high mAh as a novice.
● For the same capacity, choose a lighter battery (ensuring quality, of course).
● Avoid full-throttle flying all the time — it drains power as fast as a sports car burns fuel!
● In fact, having two or three medium-capacity batteries is more practical than one extra-large one. After all, you can swap batteries and keep flying instead of being stuck with an overloaded battery. Makes sense, right?
(II) Voltage
When it comes to “power” in batteries, “voltage” is the key! Think of it like the gears on an electric scooter: the higher the voltage, the faster the motor spins, and the more powerful the drone flies — similar to twisting the scooter throttle to the max and zooming off.
Common drone batteries on the market are made by stacking “3.7V small batteries” (called “1S”): 2 in series = 7.4V (2S), 3 in series = 11.1V (3S), 4 in series = 14.8V (4S), and so on. For example, a battery labeled “11.1V 3S” means 3 3.7V small batteries connected in series — just like stacking three AA batteries for power, which is definitely more powerful than a single battery.
But high voltage comes with caveats:
1. Your drone’s motor and ESC (Electronic Speed Controller) must “handle” the voltage. It’s like putting a sports car battery in a toy car — it might burn out immediately!
2. Higher voltage = more battery cells = increased weight, which becomes a burden during long flights.
Novices don’t need to pursue the highest voltage. First, check the recommended “XXS” model in your drone’s manual (e.g., the most common 3S, 4S) and buy a battery with the corresponding voltage — you can’t go wrong.
A quick fact: A fully charged battery is 4.2V per cell. Be careful when it drops to 3.7V; going below 3V may cause the battery to “shut down” or even get damaged — just like charging your phone when it hits 10% instead of draining it completely! Keep an eye on the voltage while flying to ensure both performance and safety for a great flying experience.
(III) Cell Count (S) and Parallel Count (P)
Confused by “3S” or “4S” when buying batteries? Don’t be! The “S” stands for “number of small batteries in series.” Think of each small battery as a 3.7V “energy block” — 1 block = 1S (3.7V), 2 blocks in series = 2S (7.4V), 3 blocks = 3S (11.1V), all the way up to 12S (44.4V)!
For example:
● A 4S battery consists of 4 3.7V small batteries in series, with a nominal voltage of 14.8V (4×3.7V). When fully charged, each cell reaches a maximum of 4.2V, so a fully charged 4S battery is 16.8V (4×4.2V).
● Never discharge it below 12V (4×3V), otherwise the battery may get damaged!
What about “P”? For example, “4S2P” — the “P” stands for “parallel.” Simply put, 2P means connecting 2 sets of identical batteries in parallel. The capacity doubles, but the voltage remains the same. For example, two 2S 1000mAh batteries in parallel become a 2S 2000mAh battery — it lasts longer but is also heavier. However, novices rarely need “P”; most common batteries are labeled “XXS” (e.g., 3S, 4S). Just remember: S count = voltage!
When choosing a battery: If your drone’s manual recommends “3S,” stick to a 3S battery. Don’t randomly switch to a higher S count! The wrong voltage may burn the motor. Understanding your drone’s “preferences” is more important than anything else.
(IV) Internal Resistance
Think of internal resistance as “invisible friction” inside the battery — when current tries to flow out to power the drone, it has to overcome this resistance. For drones, this is crucial for flight performance, battery durability, and even safety.
1. Why is it so important?
● Performance reduction: Low internal resistance allows current to flow smoothly, giving the drone powerful acceleration and stable voltage during full-load operation — no sudden “dropouts.” High internal resistance is like running with sandbags on your legs; the drone feels sluggish and unresponsive.
● Battery “health indicator”: New batteries have very low internal resistance. As they are used and charged/discharged repeatedly, internal resistance gradually increases — similar to how human functions decline with age. Checking internal resistance tells you if the battery is still usable.
● Safety red line: High internal resistance generates more heat when current passes through, making the battery prone to overheating. LiPo batteries are extremely sensitive to heat, which can cause swelling or even combustion — not something to take lightly!
2. What’s a normal internal resistance? (Per cell)
Novices don’t need to memorize complex numbers — just these benchmarks:
● Excellent/New: 0~1.5 milliohms (mΩ) — takes off with a “roar” and has plenty of power.
● Good/Healthy: 1.5~3 mΩ — sufficient for daily flights, stable and reliable.
● Fair/Aging: 3~5 mΩ — voltage drops quickly during long flights, and endurance is noticeably shorter.
● 5 mΩ: Basically only suitable for “training purposes” — don’t rely on it for high-intensity flights; safety first!
Key point: Pay more attention to “changes” than absolute values! For example, if a new battery has 2 mΩ and becomes 4 mΩ after 6 months, even if it’s below 5 mΩ, it means it’s “aging faster.” Reduce high-intensity flights accordingly.
3. How to measure it? It’s simple!
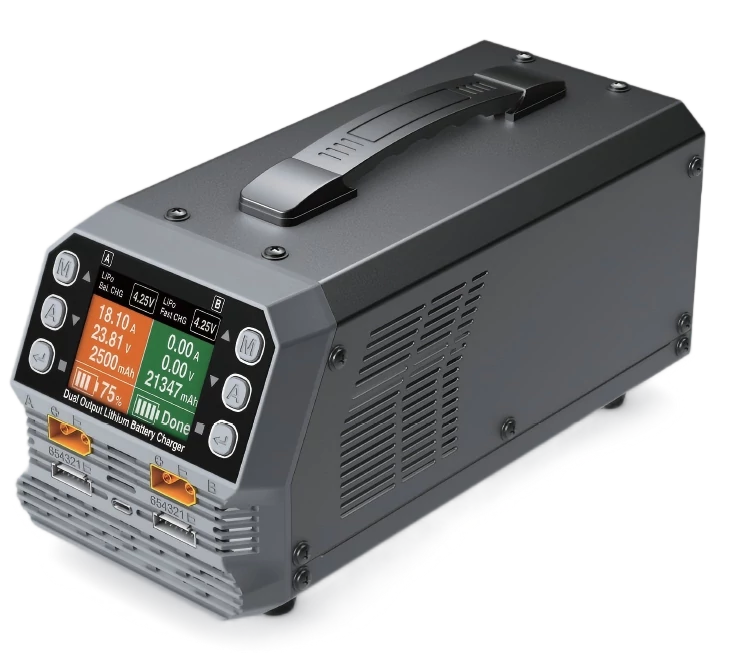
● Smart charger: Chargers from brands like SkyRC, iSDT, and HOTA can measure the internal resistance of each cell when connected to the main plug and balance lead (look for AC-IR/ESR readings). However, smart chargers have relatively large measurement errors.
● Dedicated internal resistance meter: For greater accuracy, buy a dedicated meter (costing tens to hundreds of yuan). Just clamp it on, and you’ll get a reading in seconds — it also eliminates interference from wire resistance, ideal for serious hobbyists.
Measurement tips:
● Measure at room temperature: Internal resistance increases in cold weather and decreases in hot weather. 25°C is the most accurate.
● Measure at half-charge: Avoid measuring when the battery is fully charged or nearly dead. The most stable readings are at storage voltage (3.8~3.85V per cell).
In short, internal resistance is like the battery’s “medical checkup report.” Checking it regularly ensures a smooth flight and peace of mind regarding safety.
(V) Discharge Rate
The discharge rate is the battery’s ability to “discharge quickly” — simply put, how powerfully it can supply electricity to the drone. For example, batteries labeled “25C” or “50C” have a discharge rate indicated by the “C” value. The higher the number before “C,” the stronger the “burst power” — similar to the difference between a sports car and a family car: the former zooms off with a press of the accelerator, while the latter may accelerate slowly.
1. What does it actually mean?
Take a common 20C battery as an example: If the battery capacity is 1000mAh (1Ah), its maximum output current is Capacity × C rating = 1Ah × 20C = 20A. You can roughly understand it as: A higher C rating means the battery can “pump” out more current instantly, so the drone won’t “dropout” during acceleration, carrying loads, or performing difficult maneuvers.
2. Why should novices care?
● Sufficient power: Drone takeoff, climbing, and wind resistance all require a burst of large current. An insufficient C rating may result in shaky takeoffs or slow response when trying to avoid obstacles quickly.
3. Common misunderstandings to avoid:
● Higher C rating isn’t always better: High C rating batteries are usually more expensive and “delicate” (faster discharge generates more heat). Excessively high C rates cause rapid heating, which increases internal resistance over time.
● Distinguish between “continuous C” and “peak C”: Some batteries are labeled “100C (peak)/50C (continuous)” — meaning they can reach 100C for short bursts but only maintain 50C for extended periods. Don’t just look at the big number; focus on continuous discharge capacity.
● Combine with capacity: For example, a 1000mAh 20C battery and a 2000mAh 10C battery both have a maximum current of 20A. So performance isn’t just about C rating — calculate the actual output by combining it with capacity.
● Be wary of exaggerated labels like “100C! 150C!”: Some brands claim 100C discharge rates, but the actual continuous discharge is only 60C. Always ask for clarification. Industry unspoken rule: Many C ratings refer to “peak instantaneous values,” with continuous capacity being 70% of the claimed number.
(VI) Weight
Battery weight is the “invisible balancer” of a drone. Choosing the wrong weight will either prevent it from flying or drastically reduce maneuverability. Novices should start with a golden rule: Battery weight ≈ 50% of the drone’s empty weight (empty weight = fuselage + motor, excluding battery and camera). For example, a 600g drone pairs best with a 300g battery — it won’t be “top-heavy” and will maintain flexible control, making rolls and sharp turns stable and smooth.
But this rule isn’t set in stone! For example:
● Large “professional” drones used for filmmaking may have a 1:1 battery-to-empty-weight ratio to carry cameras for time-lapse photography, sacrificing some maneuverability for longer endurance — it’s worth it.
● Racing drones (FPVs) need lightweight high-C batteries. Even an extra 10g can make turning “sluggish.”
Avoidance Guide:
● Don’t blindly pursue “high capacity and long endurance.” Doubling capacity often means doubling weight, making the drone fly like carrying a brick.
● Check the drone’s “maximum takeoff weight” before buying a battery. Exceeding it not only damages the motor but also drastically increases the risk of crashing.
● Also check the battery size — one that doesn’t fit in the battery compartment is useless. For example, a long, high-capacity battery won’t work if the drone’s battery compartment is square; forcing it in may damage the circuit board.
Pro tip from experienced pilots: Have two or three batteries of different weights. Use a lightweight endurance model for landscape photography and a small-capacity, lightweight model for stunts — flexibility is key!
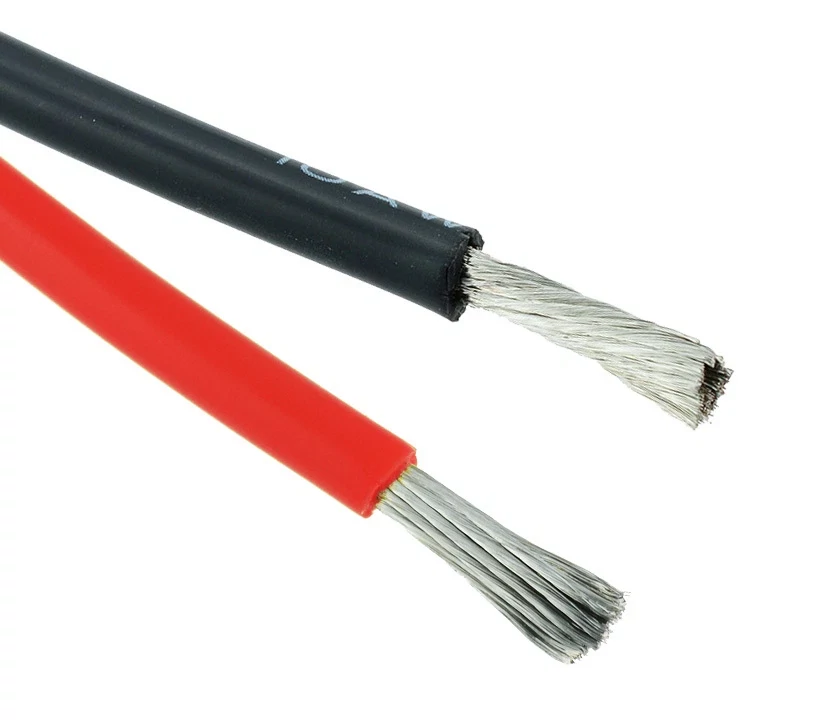
(VII) Connectors
The connectors on a battery aren’t randomly designed — one is for “power supply,” and the other is for “health checks.” Understanding these two as a novice ensures safe charging and trouble-free flights!
1. Main Discharge Connector: The “Highway for Current”
This is the prominent thick wire + large connector on the battery. The red and black wires directly supply power to the drone, like the main pipeline “feeding” the motor. Common types include:
● XT60: The “industry standard” connector. Large size, capable of handling high currents (tens of amps), and widely used in 5-inch FPV drones and aerial photography drones.
● XT30: The “mini version of XT60.” Exclusive to small drones (e.g., 3-inch FPV drones, indoor practice drones). Don’t use it for large drones — it will “clog” and overheat.
● PH2.0/BT2.0/A30: Toy-grade small connectors (exclusive to 1S batteries). Thin pins and low current capacity — using them for large drones will burn the wires instantly!
Key point: Match the connector type to your drone’s original battery! For example, if the original battery uses XT30, an XT60 battery won’t fit — don’t force it!
2. Balance Connector: The Battery’s “Health Manager”
The small set of thin wires + white connector next to it (officially called JST-XH) may look insignificant, but it’s the battery’s “lifesaver”!
Function: During charging, the balance charger uses it to “individually inspect” each cell. For example, a 3S battery has 4 wires (3 cells + 1 common terminal), ensuring each cell is charged to 4.2V and preventing swelling from overcharging a single cell.
Number of wires = number of cells + 1: 2S = 3 wires, 3S = 4 wires, and so on. Missing a wire means the line is broken — get it repaired immediately!
Note: 1S batteries (single cell) don’t need a balance lead, but multi-cell batteries must have one! Otherwise, you risk damaging the battery during charging — don’t regret it later.
3. Hard-Learned Lessons: Mistakes Novices Should Avoid
● Charging without connecting the balance lead: It’s like a doctor without tools — the battery won’t charge fully and may overcharge! A balance charger must connect both the main plug and the balance lead.
● Letting the balance lead dangle during flight: Propellers can easily cut the thin wires, especially during high-speed FPV flights. Secure the wires to the fuselage with rubber bands!
● Ignoring oxidized connectors: Blackened metal contacts or poor connections? Clean them with fine sandpaper or replace the connector (affordable on platforms like Taobao — you can do it yourself).
● Mixing different connectors: Forcing an XT60 to connect to an XT30 will cause poor contact and crashes at best, or short circuits and smoke at worst!
III. How to Charge a Drone Battery?
Lithium Polymer Drone Battery Charging Guide
(I) Key Checks Before Charging
1. Battery Condition Assessment
● Balance lead integrity: For multi-cell batteries (2S and above), ensure the pins are not bent or broken, and the wire sequence matches the number of cells. For example, a 3S battery should have 4 balance wires (3 cells + 1 common terminal).
● Cycle life record: If the battery has been used for more than 100 cycles, focus on internal resistance changes (measured via the charger). Use caution if the single-cell internal resistance exceeds 8mΩ.
2. Equipment Compatibility Confirmation
● Charger power matching: High-capacity batteries (e.g., 10000mAh and above) require a charger supporting the corresponding power (e.g., 120W and above) to avoid charging interruptions due to insufficient power.
(II) Standardized Charging Process
1. Connection Specifications
● Secure the plug: Fully insert and lock the main discharge plug to prevent sparking or incomplete charging due to poor contact. Connect the balance lead first, then the main plug, and finally power on the charger.
● Select “Balance Charge” mode: The safest mode, which automatically balances the voltage of each cell.
● Set current to “1C”: For example, a 1500mAh battery should be charged at 1.5A (1500mA), taking about 1 hour to fully charge. Novices should not exceed 2C — fast charging damages the battery! Some batteries support “3C fast charging” (e.g., high-rate FPV batteries), but only use this if the battery is labeled “3C Charge” and the charger supports the fast-charging protocol.
● Parallel charging of multiple batteries: If using a parallel board to charge multiple batteries simultaneously, ensure all batteries have the same cell count, similar capacities (difference ≤20%), and a single-cell voltage difference ≤0.1V to avoid 环流 damage.
2. Special Requirements for 1S Battery Charging
1S batteries (single cell) require a dedicated 1S charger or series charging board. Do not directly connect them to multi-cell balance charger interfaces to avoid overvoltage damage.
3. Charging Environment: Keep Away from “Flammables and Explosives”
Charge in a well-ventilated area free of flammable materials (e.g., a balcony with tile flooring). Do not charge on beds or sofas. Keep a fire extinguisher nearby or place the battery in a “fireproof bag.”
Never leave the battery unattended while charging! Monitor the process. If the battery makes a “hissing” sound or emits an irritating odor during charging, immediately disconnect the power — this may be a sign of an internal short circuit.
4. How to Know When It’s Fully Charged?
The charger light turns green/discovers “FUL,” or the single-cell voltage reaches 4.2V (measured with a multimeter for accuracy).
Unplug immediately after full charge! Overcharging for even 10 minutes may cause swelling.
5. Not Using It Temporarily? Charge to “Half Full” Before Storage
If there’s 30% power left after flying, top it up to 50%-60% (3.8-3.85V per cell) before storing. Long-term storage at full charge = accelerated aging.
Store in a cool, dry place. Do not leave it in a car to bake in the sun, or place it with keys or coins (risk of short circuit).
(III) Safety Warnings and Taboos
● Do not touch the battery’s positive and negative terminals with metal tools — this may cause a short circuit.
● Do not cover the battery during charging (e.g., with clothes or books), as this prevents heat dissipation.
IV. Safe Usage Specifications for Drone Batteries
(I) Charging Safety Requirements
1. Before charging, carefully read the charger’s user manual to confirm it is a dedicated lithium polymer (LiPo) battery charger. Do not use chargers designed for nickel-metal hydride (NiMH), nickel-cadmium (NiCd), lithium iron phosphate (LiFePO4), lead-acid, or other incompatible battery types. If the charger supports multiple battery type switches, strictly select the lithium polymer mode to avoid safety accidents due to incorrect mode selection.
2. Conduct a comprehensive inspection of the battery before charging. Focus on checking for packaging damage, wire breakage, connector damage, or other defects that may cause short circuits — such batteries are prohibited from charging. Also, verify the battery voltage to ensure it is not below the minimum safe starting voltage. If the voltage is insufficient, it indicates the battery may be over-discharged or faulty — do not charge it.
3. Ensure the charging cable is compatible with the battery connector. Carefully check the polarity of the battery cable and charging cable before connection to prevent short circuits due to reverse polarity. Confirm the charger is in good condition — do not use low-quality chargers. It is recommended to use professional lithium polymer chargers, and the user shall be responsible for verifying the charger’s normal operation.
4. The charging environment must be open, well-ventilated, and clean. Keep it away from flammable substances, liquids, and explosive environments. Do not charge the battery inside the drone. The charging process must be monitored by a person at all times. Using a fireproof charging bag is recommended to enhance safety protection.
5. Strictly follow the requirements marked on the battery label when setting charging parameters. Accurately set the number of cells, voltage, and charging current. The charging rate shall not exceed 1C (1 times the battery capacity in ampere-hours), unless the manufacturer specifies otherwise or the device has preset special combination parameters. Do not change the charging rate after charging starts.
6. Strictly prohibit overcharging. The charging voltage shall not exceed the rated maximum voltage (usually 4.2V per cell for lithium polymer batteries), and the charging capacity shall not exceed the upper limit marked on the battery label. After the battery is fully charged, promptly disconnect the charger from the battery to avoid safety hazards caused by prolonged connection.
7. Strictly control the charging temperature. Do not charge in an environment below 0℃ (32°F) or when the battery feels extremely hot (above 100°F). Do not touch the battery until it has cooled down. For multi-cell battery packs used in series, use the series charging method.
(II) Discharging Safety Requirements
1. The discharge current shall not exceed the rated value marked on the battery label. Ensure the battery has adequate cooling during discharge, especially when approaching the maximum discharge rate — focus on monitoring the temperature. Strictly prohibit the battery temperature from exceeding 140°F.
2. Follow the manufacturer’s specifications for discharge voltage. Under load (connected to a device or dischargeable charger), do not discharge below the minimum approved voltage. For lithium polymer batteries, the single-cell voltage shall not drop below 3V to avoid battery damage and fire risks during subsequent charging due to over-discharging.
3. A person must be present during the entire discharge process to continuously monitor the battery status and respond to various abnormal situations promptly. In case of emergencies, immediately stop discharging, disconnect the battery, transfer it to a safe area away from buildings, vehicles, and flammables, and observe it for at least one hour to prevent fire risks caused by chemical leakage from the battery.
4. Recheck the battery status before discharge. If abnormalities such as cell imbalance, swelling, or leakage are found, stop using it immediately.
(III) Usage Safety Requirements
1. The optimal operating temperature range for lithium polymer batteries during drone flight is 25℃ to 60℃. Low-temperature environments will reduce battery performance, exacerbate voltage drop, and shorten flight time — it is recommended to take thermal insulation measures before flying. High-temperature environments will damage the battery — avoid prolonged exposure to sunlight in summer.
2. Real-time monitor the battery voltage during flight. When the voltage drops to 3.5V to 3.6V, land promptly to avoid over-discharging, which increases battery load, shortens service life, and reduces the risk of damaging cells by dropping below the safe voltage limit. For micro 1S batteries, it is common to discharge to 3.0V-3.2V, but ensure the voltage returns to the safe range after landing.
3. Avoid physical damage to the battery during use, such as impact, puncture, bending, or dropping. Do not strike the battery with sharp-edged components, disassemble the battery, open it, or deform the folded edges of the battery — this may cause internal short circuits, leading to gas leakage, fire, or other dangers.
4. Trim your nails or wear gloves before touching the battery to avoid scratching the battery with your nails or coming into contact with the electrolyte. If the electrolyte accidentally contacts the skin or eyes, rinse immediately with water and seek medical attention promptly.
5. Prohibit reverse charging. Always confirm the polarity is correct before wiring. Incorrect connection not only prevents charging but also may damage battery performance, cause overheating, or leakage.
6. If the battery is damaged, overheats, swells, or shows other abnormalities during use, immediately stop charging or discharging, quickly disconnect it from the device or charger, place it in a fireproof container (e.g., a lithium polymer safety bag), and leave it in an open area away from flammables. Observe it for one hour. If the status stabilizes, stop using the battery — do not continue operation, transportation, or attempt to repair it.
V. Storage, Transportation, and Disposal Specifications for Drone Batteries
(I) Storage Specifications
1. Strictly control the storage voltage between 3.6V-3.9V per cell. This voltage range corresponds to 40%-50% remaining battery capacity, which is a stable storage state for lithium polymer batteries, effectively extending battery life and ensuring safety. For long-term storage (more than 3 months), it is recommended to maintain the voltage at 3.80V-3.85V per cell. Most modern chargers have a “storage charge” function that automatically adjusts the battery to this voltage range.
2. The storage environment should have a temperature between -10℃ and 45℃. For long-term storage (more than 3 months), further control the temperature to 23±5℃ and humidity to 65±20% RH. Avoid extreme temperatures, direct sunlight, and humid environments — store in a room temperature, cool, and dry place.
3. Use non-conductive, fireproof dedicated containers for storage, such as lithium polymer safety bags, metal ammo boxes, or Bat-Safe lithium polymer battery boxes. When using a metal ammo box, remove the rubber seal from the lid and drill holes for ventilation if necessary to prevent pressure buildup in the sealed container. Do not store loose batteries together to avoid short circuits caused by terminal contact. Do not touch the battery terminals directly with metal objects.
4. Disconnect all connections when the battery is not in use. Check the battery status before long-term storage (more than 2 weeks) to ensure no damage, swelling, or other abnormalities. Regularly check the voltage of stored batteries. If it is below the recommended storage voltage, recharge it to the specified range promptly.
5. Do not store the battery at full charge or fully discharged for a long time — these states accelerate battery aging. If not using it for the next few days, adjust the battery to the storage voltage. If not using it for more than a few weeks, it must be placed in the storage charge state.
(II) Transportation Specifications
1. Domestic transportation must comply with relevant postal and logistics regulations. Lithium metal (non-rechargeable) batteries and lithium-ion (rechargeable) batteries installed in devices or packaged with devices can be shipped in limited quantities by air or ground transportation. When shipped separately without a device, they are only allowed for domestic ground transportation (per USPS regulations) — always follow the carrier’s requirements.
2. For air travel, strictly comply with FAA and airline regulations: Spare (uninstalled) lithium-ion and lithium metal batteries must be carried in carry-on luggage — never in checked luggage. If carry-on luggage needs to be checked at the gate or in the cabin, remove all spare batteries and carry them on your person.
3. For air travel, the battery must be in the storage charge state. Seal the connector with tape or a dedicated cover and store it in a lithium polymer safety bag. Do not carry damaged, swollen, leaking, or electrolyte-smelling batteries during travel.
4. Lithium batteries exceeding 100Wh require airline approval before being carried on board. Each passenger is allowed a maximum of 2 spare batteries.
5. Confirm the carrier’s (airline, logistics company) battery transportation regulations before shipping. Logistics providers like FedEx and UPS offer lithium battery transportation guides — review them in advance. During transportation, avoid physical damage such as impact or extrusion to the battery, and ensure the packaging is secure.
(III) Disposal Specifications
1. Fully discharge the battery before disposal. After discharge, take it to a local recycling center or use professional recycling channels like Call2Recycle. Do not dispose of it with regular household waste.
2. Damaged, swollen, leaking, electrolyte-smelling, burned, or corroded batteries require special handling: Immediately stop using them, place them in a fireproof container, keep them away from fire sources, bury them in non-flammable materials like sand or cat litter, or seal them in a transparent plastic bag and take them to a municipal household hazardous waste recycling center. Do not discard, incinerate, or soak them in water, beverages, or other liquids.
3. Battery replacement must be performed by professional personnel from the cell supplier or device manufacturer — do not replace it yourself.
4. If the battery’s plastic casing is damaged, the packaging is deformed, electrolyte leaks, or there is an unusual odor during transportation or storage, do not continue using or transporting it. Dispose of it according to the damaged battery disposal process.
5. When disposing of waste batteries, follow the principle of “separate collection and classified recycling.” Do not disassemble or puncture the battery to avoid fire or environmental pollution. To find recycling points, contact the local municipal office, household waste disposal service, or the product purchase merchant.